How to Import PST File in Outlook: Full Guide


Microsoft Outlook stores mailbox data in PST files, which are Personal Storage Table files. The PST file will include emails, attachments, contacts, calendars, tasks, notes, journals, and even original folder structure. People usually create PST files when performing backup operations, archiving old emails, transferring data to another computer, or migrating mailbox data between different Outlook profiles.
Importing PST file in Outlook will become very important when restoring archive emails, setting up Outlook on a new computer, merging mailbox data, or gaining access to old Outlook data. The option to import PST is provided in the built-in Outlook interface, and users have a choice of either importing a PST file into their mailbox or opening it as a separate data file.
Still, the capabilities of the importing operation vary depending on whether people use classic Outlook, new Outlook, or Outlook for Mac. At the moment, Microsoft says that new Outlook allows opening email from PST files, but the actual importation of the email, contacts, and calendar items is still not available in new Outlook.
What Is an Outlook PST File?
PST File: It is a locally stored Outlook data file, which is usually linked with the following:
-
Emails along with attachments
-
Inbox, Sent Items, Drafts, and customized folders
-
Contacts and distribution lists
-
Events and meetings in the calendar
-
Tasks, notes, and journal items
-
Read/Unread status and folder structure
PST files are very helpful when transferring the data of Outlook from one computer to another computer. But it should be noted that copy of the PST file does not include the settings for the respective email account. Email account has to be configured before opening the PST file.
Before You Learn How to Import PST File in Outlook
Perform the following actions to ensure uninterrupted and full PST import process.
1. Copy PST file to the local drive
Do not attempt to perform an import process from an external drive, network folder, CD, DVD, or synchronized cloud. Copy the file to your local folder, such as:
C:\Users\Username\Documents\Outlook Files
Importing PST from the local drive makes connection problems or permission problems less likely to happen.
2. Remove the read-only attribute
PST file, which was copied from an optical disk or particular type of backup device, may have read-only attribute set.
-
Right-click the PST file.
-
Next, Go to Properties.
-
Uncheck Read-only box.
-
At last, Press Apply and OK.
3. Make sure that Outlook version is compatible with the PST file
Complete Import and Export Wizard is available in classic Outlook. New Outlook application does not support PST files fully yet, so you will need to use classic Outlook for contacts, calendars and folders import.
4. Create backup of your original PST file
Make one more copy of PST file before you import it. It might come in handy in case of unexpected Outlook closure, damaged PST file, or incorrect duplicate handling option selected.
Also, Check the article on – Open PST file without Outlook
#1: How to Import PST File in Outlook Using Import/Export Wizard
The Import and Export Wizard is the best way to go about combining PST data with an existing mailbox.
Step 1: Open the Import and Export Wizard
Start classic Microsoft Outlook and tap on File in the upper left corner.
Select:
Open & Export → Import/Export
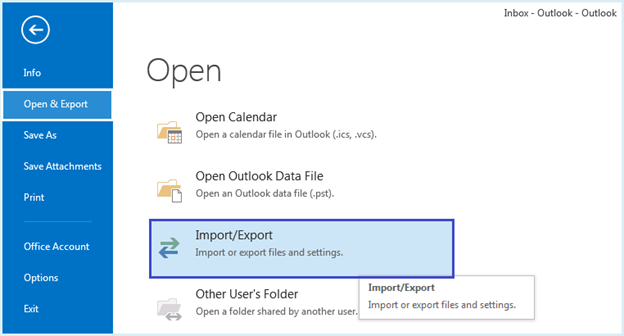
The Import and Export Wizard will pop up. This procedure applies in current classic Outlook versions such as Outlook in Microsoft 365, Outlook 2024, 2021, 2019, and 2016.
Step 2: Pick the import procedure
After that, Click Import from another program or file and click Next.
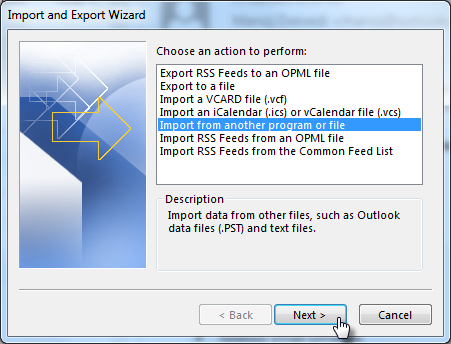
Do not pick “Import an iCalendar” or other formats since these will not allow processing the PST mailbox.
Step 3: Pick the Outlook data file format
Pick Outlook Data File (.pst) and click Next.
Outlook will prompt you to browse for the source file and to resolve possible duplicates.
Step 4: Selecting the PST to Browse through
Go to the Browse button, select the folder where the PST resides, select it and then click Open.
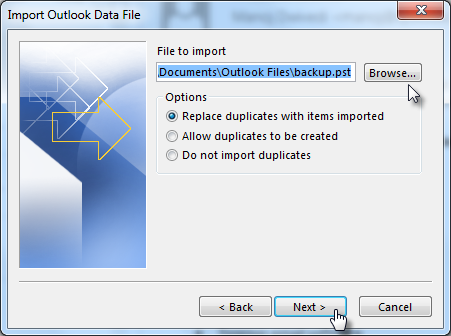
There are three possible approaches towards duplication management:
-
Replace duplicates with imported items: Items that are similar are overridden by imported items.
-
Allow duplicate items creation: Outlook imports all the items regardless of existing duplicates.
-
Do not import duplicates: Items similar to the imported ones are not affected. Outlook ignores duplicated items.
In most cases it is safer to use “Do not import duplicates” approach. Still, the Outlook approach to detecting duplicates may not recognize all similar messages due to differences in metadata.
Step 5: Enter the password if it is necessary
Henceforth, the password prompt may pop up in case the file is password protected. Enter the correct PST password and proceed. Without valid credentials the Outlook cannot import a password protected file.
Step 6: Folders to import and destination selection
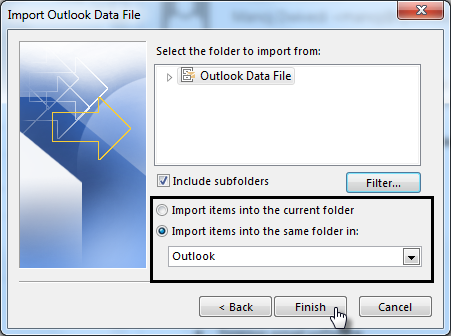
For importing a whole mailbox, select the top PST folder. Make sure that Include subfolders is enabled for importing of all the folders including Inbox, Sent Items, Drafts, contacts, calendars and other custom folders.
Next, select one of the available destinations:
-
Import items into the current folder
-
Import items into the same folder in: [selected mailbox]
The second option is preferable as Outlook tries to create the folders with the same structure as in the source mailbox.
Step 7: Start Importing
Lastly, Click Finish. Outlook will start copying the selected information. Import process can be performed even without showing a progress bar, especially while importing a large PST file.
Wait for the imported folders and messages to appear. Do not switch off Windows or remove the storage drive while importing.
#2: How to Import PST File in Outlook by Opening It Separately
Opening and importing are different processes. During importing, items are moved into the already existing mailbox, whereas during opening, the PST is attached to the Outlook profile and displayed in the form of a new folder hierarchy.
This process may be needed when one wants just to review archived email messages or move some of them manually.
-
Start classic Outlook.
-
Choose File.
-
Go to Open & Export.
-
Choose Open Outlook Data File.
-
Navigate to the desired .pst file.
-
Select it and choose Open.
The opened file will show up in the left navigation pane usually under the title “Outlook Data File” or any other title depending on the name of the initial archive. All in all, One can browse through the folders, read messages, search for any message and drag chosen ones to another Outlook folder.
By opening a PST file, one leaves it separate without merging it with the current mailbox instantly. Later to detach it from the mailbox, it is necessary to right-click the name of the data file and choose Close Outlook Data File.
If a user does not have Outlook installed and needs to just view the contents of the file, such as messages, attachments, contacts, or any other content, then the solution could be Free PST Viewer Software.
Import PST Data into New Outlook
There are differences between new Outlook and classic Outlook when it comes to the handling of PST files. Presently, Microsoft allows its users to open PST files and view, manage, or transfer supported emails between the PST file and the mailbox. However, the features are still restricted:
-
Full PST import is not possible at present.
-
No access to contacts that are in PST files.
-
No access to calendar items from PST files.
-
There is no Import and Export Wizard.
In order to fully migrate a mailbox, one must switch from new Outlook to classic Outlook, import there and let the mailbox sync.
How to Import PST File in Outlook for Mac?
Outlook for Mac is able to open PST files generated in Outlook for Windows.
-
Move the PST file to your Mac.
-
Open Outlook for Mac.
-
Navigate to File → Import.
-
Pick Outlook for Windows archive file (.pst).
-
Next, Hit Continue.
-
Moreover, Browse to find the PST file.
-
Begin the process of importing.
-
Finally, Hit Finish once done with the import.
The imported items from the mailbox will be visible under On My Computer. Depending on the version of Outlook, this might not be available.
Common Problems While Importing a PST
1. Option of Import/Export is not there
Probably, you have a new version of Outlook. Change to classic Outlook to use the full wizard.
2. “File access is denied” error
Put the PST file in a local folder, make sure you have the access rights and do not mark it as read-only.
3. Outlook requests a password
The PST file has password protection on it. You need to enter the correct password. The password can be different from your Microsoft 365 or Outlook account password.
4. Some of the folders are missing
Redo the procedure and make sure that “Include subfolders” is ticked. Check if you selected the parent file and not one of the folders.
5. Duplicate e-mails exist
Usually, duplicates come due to the selection of “Allow duplicates to be created” or importing the PST file again and again. For next time, use “Do not import duplicates“.
6. PST file will not open
It can be an incomplete, corrupted, too large or inaccessible file. Make a copy before doing any repair and make sure that the PST file is fully copied to your computer.
Final Takeaway
Being able to import PST file in Outlook enables the user to retrieve their archived email information from the PST file, migrate emails to a new computer, combine multiple Outlook profiles and access their past business emails. The use of the Import and Export Wizard will be helpful if you wish to integrate the information into the current email account. If you want to keep your archive separate and have access to specific folders or emails, use Open Outlook Data File.
For the best results, carry out the process using Classic Outlook, select the right duplicate method, include all sub-folders and leave the original PST file untouched.